How to create extra switches/sensors for Asus Router using command line in Home Assistant

After you have created the SSH private key when you installed the AsusWRT official component in your Home Assistant, you can now use it to create command line switches or sensors in your HA to control even more stuffs in your Asus router. Please note that I am using Asuswrt-Merlin custom firmware in my Asus RT-AC68U router.
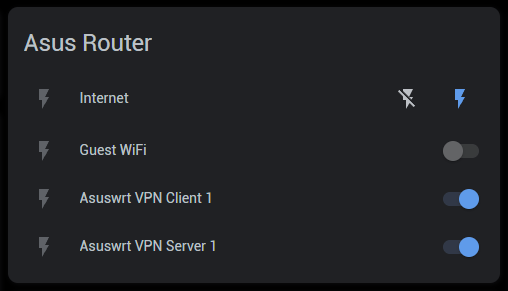
Before that, here is the demo on how it works...
Without further ado, here are the sample codes for...
Switch for VPN Client 1:
switch:
  - platform: command_line
    switches:
      asuswrt_vpn_client_1:
        friendly_name: "Asuswrt VPN Client 1"
        command_on: "ssh -o UserKnownHostsFile=/dev/null -o StrictHostKeyChecking=no -i /config/ssh/asuswrt admin@192.168.1.1 -p 44 service start_vpnclient1"
        command_off: "ssh -o UserKnownHostsFile=/dev/null -o StrictHostKeyChecking=no -i /config/ssh/asuswrt admin@192.168.1.1 -p 44 service stop_vpnclient1"
        command_state: "ssh -o UserKnownHostsFile=/dev/null -o StrictHostKeyChecking=no -i /config/ssh/asuswrt admin@192.168.1.1 -p 44 nvram get vpn_client1_state"
        value_template: '{{ value == "2" }}'
Switch for VPN Server 1:
switch:
  - platform: command_line
    switches:
      asuswrt_vpn_server_1:
        friendly_name: "Asuswrt VPN Server 1"
        command_on: "ssh -o UserKnownHostsFile=/dev/null -o StrictHostKeyChecking=no -i /config/ssh/asuswrt admin@192.168.1.1 -p 44 service start_vpnserver1"
        command_off: "ssh -o UserKnownHostsFile=/dev/null -o StrictHostKeyChecking=no -i /config/ssh/asuswrt admin@192.168.1.1 -p 44 service stop_vpnserver1"
        command_state: "ssh -o UserKnownHostsFile=/dev/null -o StrictHostKeyChecking=no -i /config/ssh/asuswrt admin@192.168.1.1 -p 44 nvram get vpn_server1_state"
        value_template: '{{ value == "2" }}'
Switch for WAN (Internet):
binary_sensor:
  - platform: ping
    host: 8.8.8.8
    name: "Internet"
    count: 6
    scan_interval: 60

switch:
  - platform: command_line
    switches:
      asuswrt_wan:
        friendly_name: "Internet"
        command_on: "ssh -o UserKnownHostsFile=/dev/null -o StrictHostKeyChecking=no -i /config/ssh/asuswrt admin@192.168.1.1 -p 44 service start_wan"
        command_off: "ssh -o UserKnownHostsFile=/dev/null -o StrictHostKeyChecking=no -i /config/ssh/asuswrt admin@192.168.1.1 -p 44 service stop_wan"
        value_template: "{{ states('binary_sensor.internet') == 'on' }}"
Switch for Guest WiFi:
Please note that Guest WiFi has to be in slot #2 or #3. Slot #1 gives unpredictable results. The sample code is for 2.4Gz radio. If your guest WiFi is on 5GHz radio, change "wl0.2" to "wl1.2"
switch:
  - platform: command_line
    switches:
      asuswrt_guest_wifi:
        friendly_name: "Guest WiFi"
        command_on: "ssh -o UserKnownHostsFile=/dev/null -o StrictHostKeyChecking=no -i /config/ssh/asuswrt admin@192.168.1.1 -p 44 nvram set wl0.2_bss_enabled=1;ssh -o UserKnownHostsFile=/dev/null -o StrictHostKeyChecking=no -i /config/ssh/asuswrt admin@192.168.1.1 -p 44 nvram set wl0.2_radio=1;ssh -o UserKnownHostsFile=/dev/null -o StrictHostKeyChecking=no -i /config/ssh/asuswrt admin@192.168.1.1 -p 44 nvram commit;ssh -o UserKnownHostsFile=/dev/null -o StrictHostKeyChecking=no -i /config/ssh/asuswrt admin@192.168.1.1 -p 44 restart_wireless service"
        command_off: "ssh -o UserKnownHostsFile=/dev/null -o StrictHostKeyChecking=no -i /config/ssh/asuswrt admin@192.168.1.1 -p 44 nvram set wl0.2_bss_enabled=0;ssh -o UserKnownHostsFile=/dev/null -o StrictHostKeyChecking=no -i /config/ssh/asuswrt admin@192.168.1.1 -p 44 nvram set wl0.2_radio=0;ssh -o UserKnownHostsFile=/dev/null -o StrictHostKeyChecking=no -i /config/ssh/asuswrt admin@192.168.1.1 -p 44 nvram commit;ssh -o UserKnownHostsFile=/dev/null -o StrictHostKeyChecking=no -i /config/ssh/asuswrt admin@192.168.1.1 -p 44 restart_wireless service"
        command_state: "ssh -o UserKnownHostsFile=/dev/null -o StrictHostKeyChecking=no -i /config/ssh/asuswrt admin@192.168.1.1 -p 44 nvram get wl0.2_bss_enabled"
        value_template: '{{ value == "1" }}'
Please bookmark this page because I will continue to add more sample code here once I discover new commands. Good luck!


Comments